A torn-up lawn can leave any homeowner frustrated, especially after discovering moles have been tunneling underneath the grass. Mole activity can mess with your yard’s appearance and disrupt soil structure, making it hard for your grass and plants to grow properly. While removing the moles is the first step, the lawn doesn’t magically fix itself once they’re gone. You’ll need to get your lawn back in shape to fully recover from the damage.
Fall is the perfect time for these kinds of lawn repairs. With cooler temperatures and more consistent moisture, grass has a better shot at taking root and bouncing back before winter sets in. If you’re seeing uneven ground, patches of dead grass, or tunnels caving in, it’s time to take action. Whether you enjoy handling yard work yourself or prefer to hand it off, understanding the basics of mole damage repair can help you plan the right approach.
Identifying Mole Damage
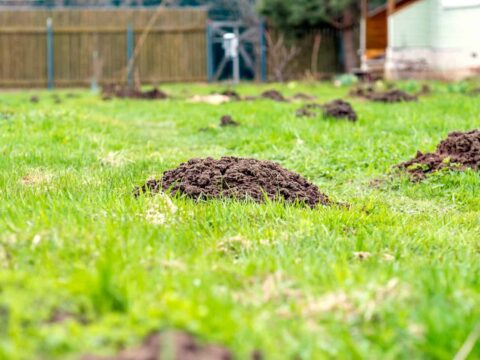
Mole damage looks different from other lawn issues. If you know what to look for, you can quickly tell whether moles have been at work or if it’s something else like grubs or dry conditions. The most obvious signs are raised ridges that run across your lawn or small volcano-shaped mounds made of pushed-up soil. These are created as moles tunnel underground while looking for food.
Here are a few things that usually signal mole activity:
– Winding ridges or surface tunnels that make the ground feel spongy underfoot
– Lumps or soil piles that appear overnight, often near tunnel entrances
– Dead patches of grass caused by roots being disturbed from below
– Uneven areas of lawn that sink or collapse when stepped on
Unlike insects that chew on roots directly, moles cause damage by digging. They’re mostly after worms and bugs, not your grass. But while they don’t eat plants, their constant burrowing can still kill grass and weaken root systems, leaving your lawn looking rough. If you catch these signs early, it gives you a better shot at reversing the damage before it spreads.
Assessing the Extent of Damage
Once you know moles have torn up your yard, the next step is figuring out how far the damage goes. This will help you decide whether you’re dealing with a few surface tunnels or more widespread destruction. Walk the yard slowly and pay attention to texture and softness. Step carefully along damaged areas and feel for sunken spots or unstable ground that might collapse under pressure. That’s usually a sign that tunnels are just below the surface.
Here’s a simple way to assess the scale of the damage:
1. Start by walking the entire yard and making a map or rough sketch
2. Circle all raised tunnels and visible soil mounds
3. Mark any patches of grass that look stressed or dead. These are often linked to underground paths
4. Use your foot to press gently along ridges. If it sinks or caves in too easily, the tunnel likely needs to be filled in
5. Check for damage around flowerbeds or near walkways where collapsing soil can become a hazard
Taking the time to evaluate the full area helps you avoid wasting time and effort on areas that aren’t affected. Once you understand where the worst damage is, you can move on to getting those specific spots patched up and growing again.
Step-By-Step Lawn Repair Process
After taking care of the moles and figuring out where the damage is, it’s time to get your lawn looking and feeling right again. Lawn repair might sound like a big job, but breaking it down into clear steps makes it manageable. Whether you’re fixing a couple of small patches or a large network of tunnels, the same basic process applies.
1. Collapse and fill tunnels
Use a shovel or the back of a rake to flatten out raised ridges. Step on them carefully to pack down the soil. Then, fill in any sunken spots or larger holes with clean topsoil. This helps prevent tripping hazards and settles the surface before reseeding or laying sod.
2. Loosen compacted soil
Tunneling can disrupt the natural structure of your soil. Before planting anything new, loosen up compacted areas using a garden fork or hand tiller. This gives roots a chance to grow deeper and improves water flow.
3. Add seed or sod
For small patches, grass seed works just fine. Choose seed that matches the rest of your lawn, sprinkle it generously over the repaired spots, and press it into the soil by walking over it or using a tamper. For bigger sections or immediate coverage, use fresh sod. Line it up edge to edge and press it in snug so it can take root.
4. Water gently but often
Keep the area consistently moist for about two weeks. Water in short bursts once or twice a day, just enough to keep the surface from drying out. Don’t drown it, just keep it damp. Once grass starts growing, you can water less often but more deeply.
5. Use soil treatments if needed
If the ground seems tired or lifeless, add an organic lawn booster like compost or a mild fertilizer. Fall is a good time for this, as it supports root growth before winter sets in.
Doing these steps carefully helps your lawn recover faster. Patience pays off, especially when you start seeing green patches take hold and cover the damaged areas.
Preventing Future Mole Activity
Once your yard is patched up, keeping moles from returning should be high on the list. Just dealing with the damage without preventing future problems can turn this into a cycle.
Start by making your lawn less inviting to moles. They’re attracted to loose, moist soil that’s rich in insects. If your yard holds water or stays damp too long, improve the drainage with aeration or soil amendment. Moles don’t like dry or compacted areas, so well-maintained grass is often less appealing to them.
Here are some easy ways to lower your chances of mole issues in the future:
– Don’t overwater. Keep irrigation on a regular schedule and avoid waterlogging the soil
– Keep your lawn mowed, raked, and free of debris so insects have fewer places to hide
– Aerate your lawn once or twice a year to keep it from becoming too soft or spongey
– Watch for new tunnels and react quickly to any signs of digging
It helps to check in on your yard every few days during peak mole seasons like spring and fall. Early signs are easier to manage than a full-blown network of tunnels.
Get Your Lawn Back On Track
Repairing mole-damaged areas may take some effort, but it puts you back in control of your outdoor space. Once you’ve fixed the visible damage and taken steps to discourage future tunneling, your lawn can bounce back stronger than before. Recovery won’t happen overnight, but regular care and attention make all the difference.
Fall is a great window for this work, especially with mild weather helping new grass establish strong roots. Whether you’re dealing with a few ridges or large bare spots, the best time to start is right after mole activity ends. With the right approach and follow-through, you can put the mess behind you and enjoy a yard that’s clean, even, and healthy again.
Repairing a lawn can be a fulfilling project for homeowners looking to restore their outdoor space to its former glory. If you’re feeling overwhelmed by the prospect of tackling mole damage repair, let Trap Your Moles help you reclaim your yard. Our team offers comprehensive services to address all your mole-related issues and keep your lawn thriving. Explore our solutions and take the first step toward a healthy and beautiful lawn.


